Service Mower
Installing or Removing Mower Drive Belt at Engine Drive Sheave (122 cm (48 in.) Deck)
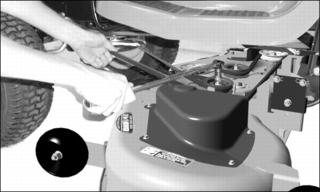
NOTE: This procedure is for easy installing and removing.
1. Put lift lever in lowest position.
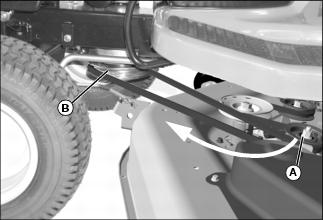
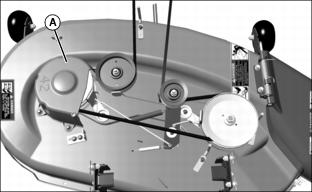
2. Put a 15mm closed wrench or a socket on the idler sheave nut (A), move idler sheave toward front of tractor and hold to release belt tension.
3. Install the belt on the drive sheave (B).
4. Release idler sheave to tighten belt.
5. Use same procedure to remove belt.
Removing Mower
1. Park machine safely. (See Parking Safely in SAFETY section.)
2. Put wood blocks under each side of mower deck.
3. Put lift lever in lowest position, bringing deck down onto blocks.
Picture Note: 107 cm (42 in.) only.
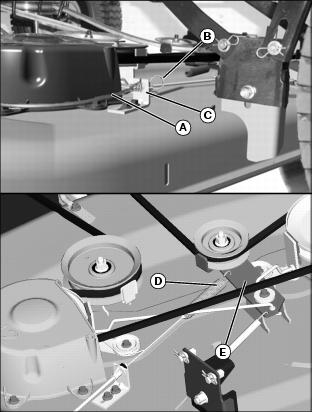
4. On machines with 107 cm (42 in.), disconnect PTO drive cable (A).
a. Remove spring locking pin (B), pull and hold PTO drive cable out, lift up and remove from bracket (C).
b. Remove cable spring (D) from idler sheave bracket (E).
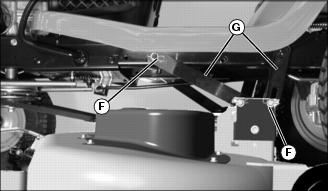
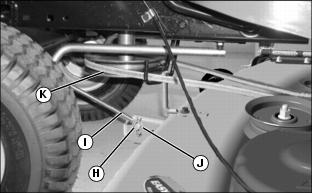
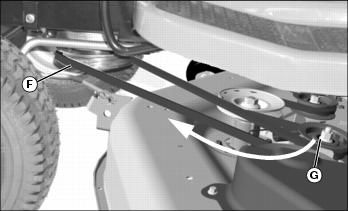
5. Remove spring locking pins and washers (F) and disconnect rear draft arms (G), two on each side.
Picture Note: 107 cm (42 in.) shown.
6. Remove spring locking pin and washer (H) and front draft rod (I) from mower deck bracket (J).
7. Remove mower drive belt from drive sheave (K).
8. Remove wood blocks from both sides and slide mower out from under the machine.
9. When operating the machine without the mower deck:
· Remove rear draft arms and front draft rod from tractor and attach them to the mower deck.
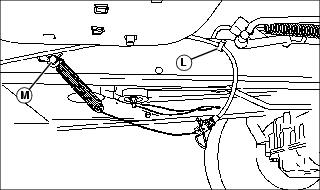
· On 107 cm (42 in.) only: Push PTO drive cable into clip (L) and hook end of cable spring with hardware (M) into peg on left side of machine frame.
Installing Mower
1. Park machine safely. (See Parking Safely in SAFETY section.)
2. Put lift lever in the transport position.
4. Put wood blocks under each side of mower deck.
5. Put lift lever in lowest position.
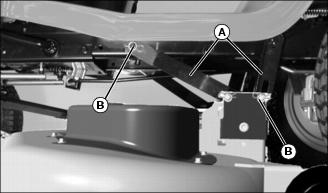
6. Fasten rear draft arms (A), two on each side, with washers and spring locking pins (B).
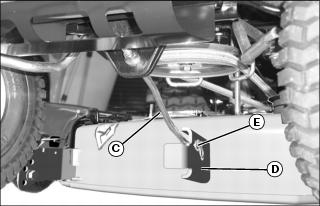
IMPORTANT: Avoid damage! To prevent clutch damage, make sure front draft rod is installed correctly. Secure rod with washer and spring locking pin on the left side of mower deck bracket. |
Picture Note: 107 cm (42 in.) used for photo purposes.
7. Install front draft rod (C) into mower deck bracket (D) and secure with washer and spring locking pin (E) on the left side of bracket as shown.
Picture Note: 122 cm (48 in.) used for photo purposes.
8. Put mower drive belt on engine drive sheave (F).
· On 122 cm (48 in.): Put a 15 mm closed wrench or a socket on the idler sheave nut, move idler sheave (G) and tensioning arm toward front of tractor and hold while installing belt on drive sheave.
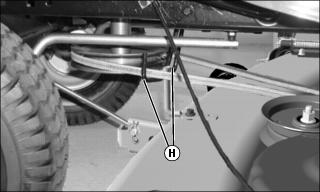
· On 107 cm (42 in.): Make sure belt is routed through both belt guides (H).
9. Remove wood blocks from both sides of mower deck.
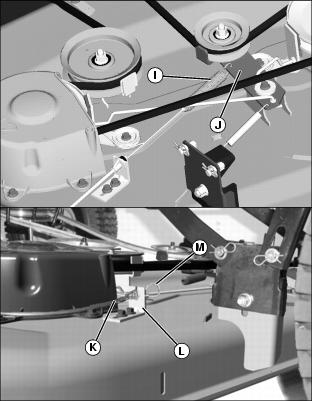
10. On machines with 107 cm (42 in.): Attach PTO drive cable.
Picture Note: 107 cm (42 in.) only.
a. Route cable under mower belt and brake rod and attach cable spring (I) to idler sheave bracket (J).
b. Pull out on cable (K), align black end of cable with slot in bracket (L) and release cable into slot. Secure with spring locking pin (M).
Replacing Mower Drive Belt (107 cm (42 in.) Deck)
1. Park machine safely. (See Parking Safely in the SAFETY section.)
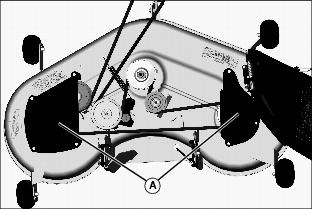
a. Remove three capscrews and belt shield (A).
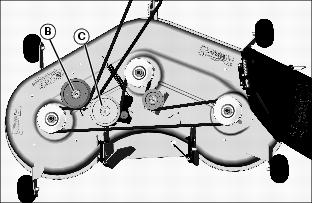
b. Loosen sheaves (B) and belt guides (C).
4. Inspect belt for wear or damage; replace as necessary.
5. Clean top surface of mower deck and sheaves.
6. Install belt on mower deck as shown. Make sure belt is in the groove of each sheave and inside belt guides (C).
7. Tighten sheaves to 47 N·m (35 lb-ft).
10. Adjust mower belt tension and spindle brakes, if necessary.
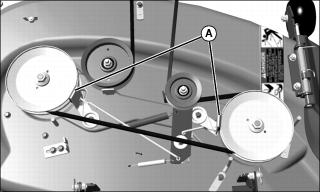
Replacing Mower Drive Belt (122 cm (48 in.) Deck)
1. Park machine safely. (See Parking Safely in SAFETY section.)
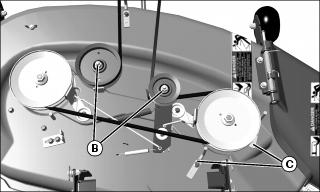
a. Remove seven capscrews and left and right belt shields (A).
b. Loosen sheaves (B) and (C).
4. Inspect belt for wear or damage; replace as necessary.
5. Clean top surface of mower deck and sheaves.
6. Install belt on mower deck as shown. Make sure belt is in the groove of each sheave.
7. Tighten sheaves to 47 N·m (35 lb-ft).
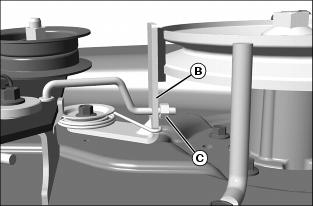
Adjusting Mower Belt Tension (107 cm (42 in.) Deck)
1. Park machine safely. (See Parking Safely in the SAFETY section.)
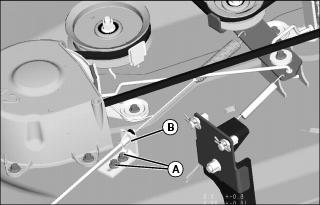
2. Loosen nuts (A) and move cable bracket (B) away from the center of deck to tighten belt tension. Tighten nuts.
Adjusting Spindle Brakes (107 cm (42 in.) Deck)
1. Park machine safely. (See Parking Safely in the SAFETY section.)
3. Remove left belt shield and adjust two blade brakes (A).
4. Measure distance from spindle brake bracket (B) to nut (C) on end of brake rod.
· Bracket to nut distance should be: 2 - 3 mm (0.08 - 0.12 in).
5. If adjustment is required, turn nut (C) on end of brake rod in correct direction to set brake at proper distance from pulley.
Checking for Bent Mower Blades
1. Park machine safely. (See Parking Safely in the SAFETY section.)
2. Raise mower to highest position to access blades.
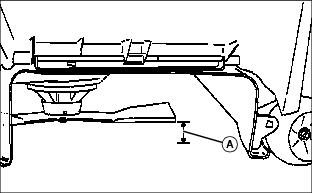
Picture Note: Mower deck with side discharge used for illustration
3. Measure distance (A) between blade tip and flat ground surface.
4. Rotate blade 180° and measure distance between other blade tip and flat ground surface.
5. Install new blade if the difference between the two measurements is more than 3 mm (1/8 in.).
Servicing Mower Blades
Removing Mower Blades
1. Raise mower deck to gain access to mower blades. If necessary, remove mower deck.
2. Block mower blade with a piece of wood to prevent it from spinning.
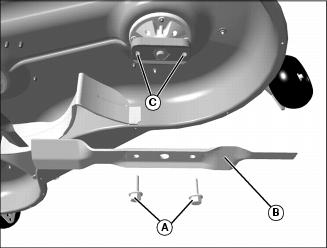
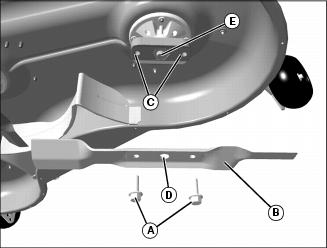
3. Loosen and remove two cap screws (A) and blade (B). Do not remove two nuts/bushings (C) inside holes of the blade adapter.
4. Inspect blades; sharpen, balance or replace blades as necessary.
Installing Mower Blades
1. Make sure that two nuts/bushings (C) are in place.
2. Position mower blade (B) with the cutting edge towards the ground.
3. Align the center hole (D) in the blade with the spindle shaft (E) and put the blade onto the mower spindle.
4. Install and hand tighten cap screws (A) until mower blade is in full contact (fully seated) with spindle.
5. Block mower blade with a piece of wood to prevent spinning and tighten cap screws to 62 N·m (46 lb-ft).
Sharpening Blades
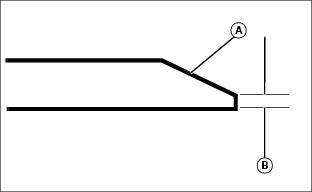
· Sharpen blades with grinder, hand file, or electric blade sharpener.
· Keep original bevel (A) when grinding.
· Blade should have 0.40 mm (1/64 in.) cutting edge (B) or less.
· Balance blades before installing.
Balancing Blades
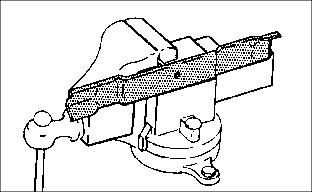
2. Put blade on nail in a vise. Turn blade to horizontal position.
3. Check balance. If blade is not balanced, heavy end of blade will drop.
