
Service Transmission
Checking Transmission
X300, X304, X320, X324 and X340:
The transmission is a sealed component. No maintenance is required on this transmission. If you suspect any transmission problems, please contact your authorized dealer.
Transmission Oil (X360)
These machines are equipped with a internal wet disc brake transmission. Use only Low Viscosity HY-GARD™ (J20D) transmission oil. Do not use type “F” automatic transmission fluid.
John Deere Low Viscosity HY-GARD™ (J20D) transmission oil is specially formulated to provide maximum protection against mechanical wear, corrosion, and foaming. It may be used in all operating temperatures.
Checking Transmission Oil Level (X360 models)
1. Park machine safely on a level surface. (See Parking Safely in SAFETY section.)
2. Move hydralic control lever back and forth a few times to relieve system pressure.
IMPORTANT: Avoid damage! Hot hydraulic oil will expand and show incorrect oil level. Check oil level: |
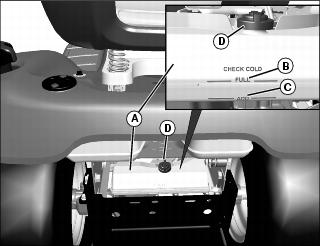
4. Locate transmission oil reservoir (A) at rear of machine. Reservoir is marked FULL (B) and ADD (C).
IMPORTANT: Avoid damage! Contamination can damage the hydraulic system. Clean thoroughly around reservoir fill cap before opening. |
5. If oil level is low, clean around reservoir cap (D).
6. Lift cap (D) to remove. Cap is not threaded.
7. Add John Deere Low Viscosity HY-GARD™ (J20D) until oil level is at FULL mark on reservoir.
10. Operate the machine in forward, then reverse, several times.
11. Park machine safely on a level surface. (See Parking Safely in SAFETY section.)
12. Wait at least 3 minutes for hydraulic fluid to cool.
13. Check oil level again. Add oil if necessary.
Changing Transaxle Oil and Filter (X360)
1. Park machine safely on a level surface. (See Parking Safely in the SAFETY section.)
NOTE: Transaxle is divided into two internally connected cavities. Front drain plug (A) will drain hydrostatic side and rear drain plug (B) will drain differential gear side.

Picture Note: View from front of machine.
3. Place drain pan under drain plugs (A) and (B). Remove plugs.
IMPORTANT: Avoid damage! Contamination can damage the hydraulic system. Clean thoroughly around reservoir fill cap before opening. |

4. Clean area around transaxle fill cap (C) on transaxle oil reservoir (D).
5. Remove fill cap to improve drainage. Allow to drain completely.
6. Replace transaxle hydraulic filter:
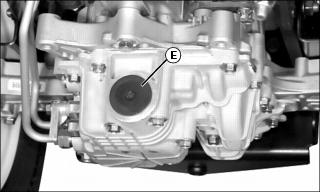
a. Remove cap (E) from front side of transaxle using a 3/8-inch ratchet.

b. Remove and discard transaxle filter (F).
c. Install new filter with spring (G) toward access cap. Install and tighten cap.
7. Install and tighten transaxle drain plugs.
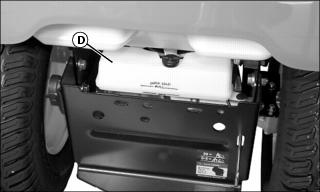
Picture Note: Shown with fill cap installed.
8. Add approximately 2.8 L (3.0 qt) John Deere Low Viscosity HY-GARD (J20D) to transaxle reservoir (D) until oil level is at FULL mark. Install reservoir fill cap.
10. Check for leaks around drain plugs and hydraulic filter.
11. Operate machine forward and in reverse several times.
12. Park machine safely on level surface. (See Parking Safely in the SAFETY section.)
13. Wait at least 3 minutes for hydraulic oil to cool.
14. Check oil level in reservoir. Add oil to reservoir if necessary.