
Service Transmission
Transmission and Hydraulic Oil
IMPORTANT: Avoid damage! Use recommended oil only. Do not use engine oil or "Type F" automatic transmission fluid. |

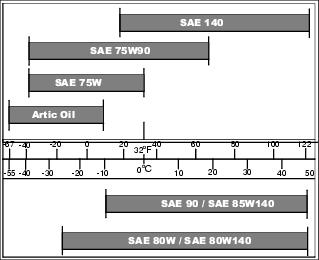
Choose oil viscosity based on the expected air temperature range during the period between oil changes.
John Deere Low Viscosity HY-GARD transmission/hydraulic fluid is recommended. John Deere HY-GARD transmission/hydraulic fluid may also be used for temperatures above -18° C (0° F).
Other oils may be used if they meet John Deere standard JDM J20C or J20D.
Checking the Hydraulic Oil Level
Check the oil level before you start the engine.
1. Park machine safely. (See Parking Safely in the SAFETY section.)
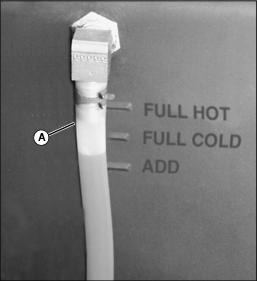
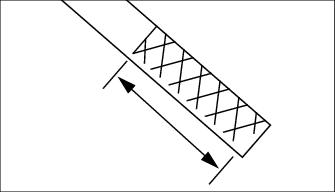
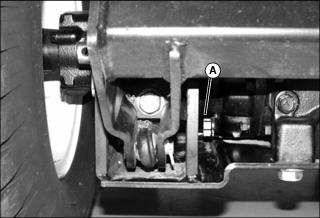
3. Check the oil level in the sight tube (A) located on the rear of the hydraulic oil reservoir. Oil level should be between the FULL COLD and ADD marks on the tube when machine is cold.
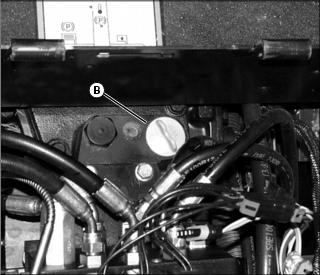
4. If oil level is below add mark, remove reservoir cap (B) and add oil until oil level is up to full mark on sight tube.
5. Install reservoir cap and close engine cover.
Checking the Transmission Oil Level
1. Park machine safely. (See Parking Safely in the SAFETY section.)
IMPORTANT: Avoid damage! Hot hydraulic oil will expand and show incorrect oil level. Check reservoir tank: |
NOTE: The hydrostatic transmission oil is separate from the hydraulic system oil and has an oil filler cap/dipstick located under the operator's seat platform.
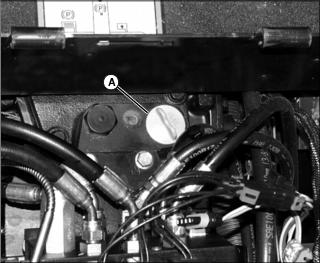
Picture Note: Seat platform removed for photo.
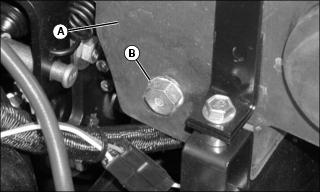
2. Lift operator's seat platform and locate the yellow oil filler cap (A) on top of transmission.
IMPORTANT: Avoid damage! Dirt and debris in oil may cause damage to the transaxle. Clean area around opening before removing dipstick. |
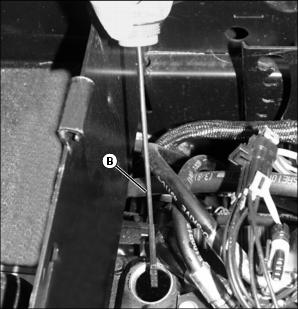
3. Unscrew the oil filler cap and wipe the dipstick (B) off with a clean shop towel.
4. Insert the dipstick until the cap contacts the transmission housing and remove again.
5. Oil level should be in XXX range on dipstick. Add oil to transmission if level does not show on dipstick.
6. Install dipstick and lower seat platform. If oil was added, check oil level after driving machine.
Changing the Hydraulic Oil and Filter
1. Lower all mower decks to ground.
2. Park machine safely. (See Parking Safely in the SAFETY section.)
3. Wait until the engine and the transmission are cool before beginning service.
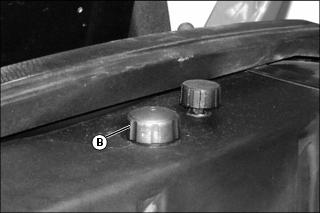
B - Right Side Reservoir Drain
4. Drain the hydraulic reservoir using a siphon pump and the two drain plugs on left and right side rear corners of reservoir. (Right side drain plug shown, left side similar).
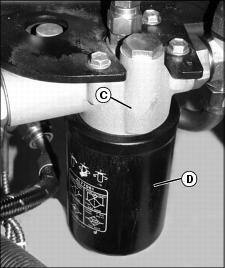
6. Clean debris from around hydraulic oil filter base (C) on left side of machine.
7. Use a filter wrench to turn the filter (D) counter clockwise. Remove the filter and drain the remaining hydraulic oil.
8. Clean the filter base and put a film of clean transmission oil on the seal of the new filter.
9. Install the hydraulic oil filter. Turn it clockwise until it contacts the mounting surface, then 1/2 turn more.
10. Fill the hydraulic reservoir until up to FULL COLD mark on sight tube.
11. Run the engine a short time while checking for leaks. Stop the engine.
12. Check that the hydraulic oil level has remained up to the FULL COLD mark on the sight tube. Add oil if necessary.
Changing the Transmission Oil
1. Lower all mower decks to ground.
2. Park machine safely. (See Parking Safely in the SAFETY section.)
3. Remove the front deck from the lift arms, and move deck to the left to gain access to the right front side of the transmission.
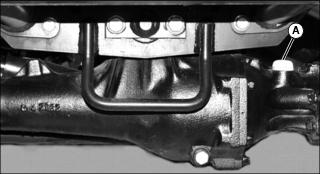
4. Remove drain plug (A) and allow transmission to drain. Replace plug.
Picture Note: Seat platform removed for photo.
6. Raise and lock seat platform.
7. Unscrew oil filler cap and dipstick (B).
8. Fill transmission with hydraulic oil until level is up to top of XXX marks on dipstick. Transmission capacity is 13.3 L (3.5 gal) when dry, but may take less when performing oil change. Do not overfill.
9. Run machine, cycling hydrostatic pedals to purge air from transmission. Recheck transmission oil level.
Adjusting Transmission Neutral
Adjust transmission neutral to assure that machine does not creep forward or rearward when pedals are in the neutral position.
1. Park machine on a firm, level surface. Place controls in following position:
· Side decks raised and transport locks engaged.
· Differential lock disengaged.
· Four wheel drive disengaged.
· Range shift lever not in neutral.
2. Jack up front of machine. Place hardwood blocks under front sub frame so front tires are off of ground.
3. Jack up rear of machine. Place jack stands under rear axle so rear tires are off of ground.
4. Sit in operator's seat and start engine.
5. Watch front tires for forward or rearward rotation.
6. Cycle forward and reverse hydrostatic pedals and allow to return to centered, neutral position. Check again for tire rotation while in neutral, indicating a neutral adjustment is necessary.
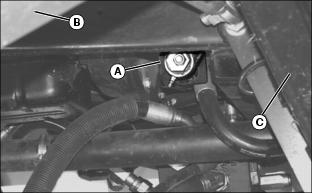
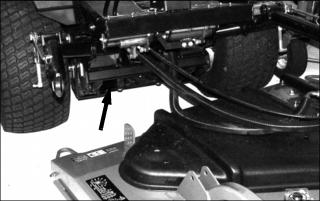
7. Locate neutral adjuster cam (A) on right side of machine, under right mower deck (B), behind deck subframe (C).
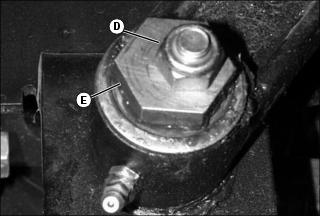
9. Rotate cam (E) until front drive wheels do not spin.
10. Tighten locknut. Cycle hydrostatic drive pedals and allow to return to neutral. Readjust cam if necessary.
Mechanical Four Wheel Drive (MFWD) Oil
· John Deere GL-5 Gear Lubricant is recommended.
· Other oils may be used provided they meet the following specifications:
Checking the Mechanical Four Wheel Drive (MFWD) Oil Level
1. Park machine safely. (See Parking Safely in the SAFELY section.)
2. Locate filler cap (A) on right rear side of rear axle.
3. Unscrew filler cap and wipe dipstick clean.
4. Install filler cap back into axle housing but do not turn threads back in.
5. Remove dipstick and check oil level on it. Oil should be in XXX area on dipstick but not above top mark.
6. Add oil if needed. Do not overfill.
Changing the Mechanical Four Wheel Drive (MFWD) Oil Level
1. Park machine safely. (See Parking Safely in the SAFELY section.)
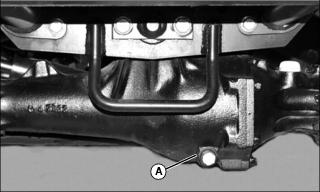
2. Place drain pan under center of rear axle housing and remove center drain plug (A).
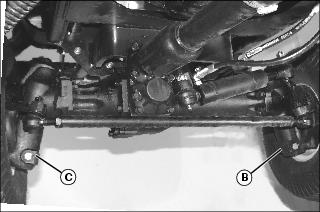
4. Remove left side final drive housing drain plug (B), and allow to drain.
6. Repeat for right side housing (C).
7. Fill rear axle housing with 4.7 L (5 qt) of oil. Do not overfill.