![]()
Introduction
Product Identification
Safety
Operating
Replacement Parts
Service Intervals
Service Lubrication
Service Engine
Service Transmission
Service Electrical
Service Miscellaneous
Selecting Front Tire Rolling Direction
Changing Wheel Spacing and Tread Width
Cleaning and Repairing Plastic Surfaces
Cleaning and Repairing Metal Surfaces
Troubleshooting
Storage
Assembly
Specifications
Warranty
John Deere Quality Statement
Service Record

Service Miscellaneous
Filling Fuel Tank
Use diesel fuel Grade No. 1-D for cold air temperatures or Grade No. 2-D fuel for warm air temperatures. Diesel fuel must be cetane Number 40. A cetane number of 50 or more is preferred, especially for air temperatures below -20°C (-4°F) or elevations above 1500 m (5000 ft).
Add John Deere fuel stabilizer to fuel before using it in your machine to prevent engine damage due to stale fuel. Follow directions on stabilizer container.
1. Park machine safely. (See Park Safely in SAFETY section.)
2. Allow engine to cool several minutes before adding fuel.
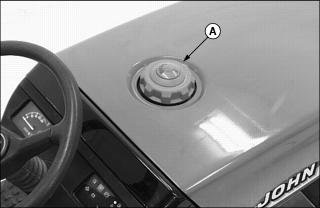
4. Fill tank with fresh fuel only to bottom of filler neck.
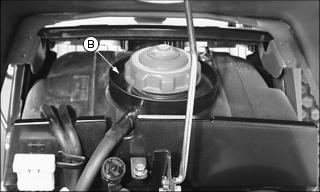
· If fuel is spilled, raise hood and clean overfill reservoir (B).
Selecting Front Tire Rolling Direction
Tractors equipped with directional type tires (such as bar tires) have directional arrows located on the tire sidewall. Under most conditions, tires should be installed with the directional arrow pointing in the direction of travel.
If tractor is mainly used for loader operations, lug direction may be reversed to increase tire life and improve traction while backing out of dirt piles.
Move wheel from one side of tractor to the other.
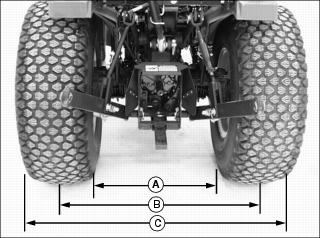
Changing Wheel Spacing and Tread Width
IMPORTANT: Avoid damage! Always make sure tires rotate in proper direction. Arrows on sidewall should point in direction of forward rotation. |
NOTE: Front and rear wheels on the model 4100 Narrow are one position wheels only.
Front Wheel Positions
Front wheels on all model 4100 compact utility tractors are one position wheels only and should never be installed in the widest position.
Rear Wheel Positions
The 9.5-16 R1 bar tire is the only rear tire option that can be changed to allow different tread widths. To provide the best stability when operating on slopes, always operate tractor with wheels mounted in the wide tread position.
Rear Wheel Positions
· Wide position - Install wheel with valve stem to the outside.
· Narrow position - Install wheel with valve stem to the inside.
Rear Tire Tread Width Dimensions
Tightening Wheel Hardware
When tractor is new or anytime wheel hardware is loosened, tighten all bolts after one hour of operation and every four hours thereafter until proper torque values are maintained.
Tightness of wheel hardware must be maintained according to service interval recommendations. Check wheel bolt tightness as follows:
Front Wheel Bolts
· Tighten front wheel bolts alternately to 171-191 N·m (129-144 lb-ft).
Rear Wheel Bolts
· Tighten rear wheel bolts alternately to 108-127 N·m (81-96 lb-ft).
Cleaning and Repairing Plastic Surfaces
Your John Deere dealer has the professional materials needed to properly remove surface scratches from any plastic surfaces, do not attempt to paint over marks or scratches in plastic parts.
1. Rinse hood and entire machine with clean water to remove dirt and dust that may scratch the surface.
2. Wash surface with clean water and a mild liquid automotive washing soap.
3. Dry thoroughly to avoid water spots.
4. Wax the surface with a liquid automotive wax. Use products that specifically say "contains no abrasives."
5. Buff applied wax by hand using a clean, soft cloth.
Cleaning and Repairing Metal Surfaces
Cleaning:
Follow automotive practices to care for your vehicle painted metal surfaces. Use a high-quality automotive wax regularly to maintain the factory look of your vehicle's painted surfaces.
Repairing Minor Scratches (surface scratch):
1. Clean area to be repaired thoroughly.
2. Use automotive polishing compound to remove surface scratches.
3. Apply wax to entire surface.
Repairing Deep Scratches (bare metal or primer showing):
1. Clean area to be repaired with rubbing alcohol or mineral spirits.
2. Use paint stick with factory-matched colors available from your John Deere dealer to fill scratches. Follow directions included on paint stick for use and for drying.
3. Smooth out surface using an automotive polishing compound. Do not use power buffer.