![]()
PIN TC1420G010001, TC1435D010001, TC1445D010001
Introduction
Product Identification
Safety
Operating Machine
Replacement Parts
Service Intervals
Service Lubrication
Service Engine
Service Transmission
Checking the Transaxle Oil Level
Changing the Transaxle Oil and Filter
Service Steering & Brakes
Service Electrical
Service Miscellaneous
Troubleshooting
Storage
Assembly
Specifications
Warranty
John Deere Quality Statement
Service Record
Copyright© Deere & Company

Service Transmission
Transaxle Oil
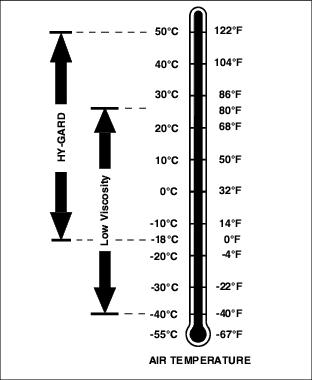
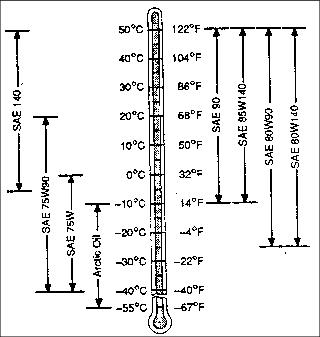
NOTE: Transaxle is filled with John Deere HY-GARD® (J20C) transmission oil at the factory. DO NOT mix oils.
Use only HY-GARD® (J20C) transmission oil.
Do not use type "F" automatic transmission fluid.
John Deere HY-GARD® (J20C) transmission oil is specially formulated to provide maximum protection against mechanical wear, corrosion, and foaming.
IMPORTANT: Avoid damage! If operating temperatures are below -18°C (0°F), you must use Low Viscosity HY-GARD® (J20D) or transmission damage will occur. |
Checking the Transaxle Oil Level
1. Park machine safely. (See Parking Safely in the Safety section.)
2. Open service hatch on operator's platform.
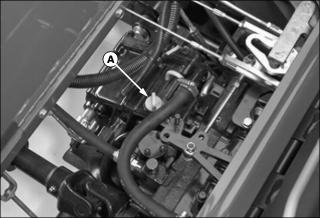
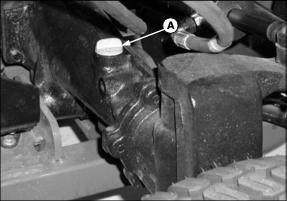
3. Locate the dipstick (A) on the top of the transaxle.
4. Unscrew the dipstick and wipe off with a clean shop towel.
5. Insert the dipstick fully into the transaxle housing and remove again.
6. Oil level should be in XXX range on dipstick. Add oil to transaxle if level does not show on dipstick. Remove oil if level is too high.
7. Install dipstick and close service hatch. If oil was added, check oil level after driving machine.
Changing the Transaxle Oil and Filter
1. Park machine safely. (See Parking Safely in the Safety section.)
2. Lower all attachments to the ground.
3. Place a drain pan under the transaxle.
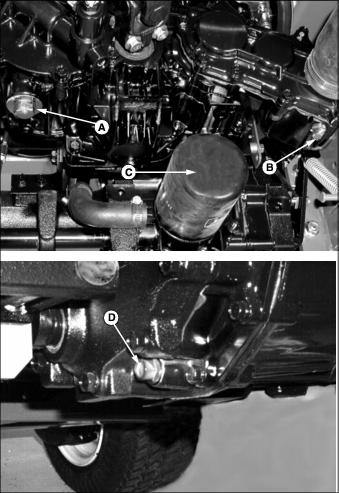
B - 4WD Housing Drain Plug (if equipped)
4. Clean away debris and remove drain plugs (A, B, and D) from locations shown above. Allow transaxle to drain.
5. Remove transaxle oil filter (C) and allow transaxle to drain. Clean oil filter mounting flange with a clean shop towel.
6. Lubricate the gasket of a new oil filter with few drops of transaxle oil, and install the filter onto the mounting flange. Tighten filter 1\2 to 3\4 of a turn after it contacts the flange.
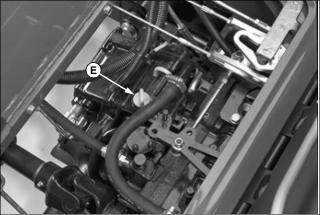
8. Raise service hatch and remove transaxle oil filler cap (E).
9. Fill transaxle with recommended oil until level is up to top of XXX marks on dipstick. Dry transaxle capacity is listed below, but it may take less when performing an oil change. Do not overfill.
10. Run machine, cycling forward and reverse pedals to purge air from transaxle. Stop machine and recheck oil level.
Adjusting Transaxle Neutral
Adjust transmission neutral to assure that machine does not creep forward or rearward when pedals are in the neutral position.
1. Park machine on a firm, level surface. Place controls in following position:
· 4WD disengaged (if equipped).
· Differential lock disengaged.
· Attachment removed or service latch locked.
· Service hatch on operator's platform unlocked.
2. Chock rear tires and raise front of machine so front tires are off of ground. Place jack stands under left and right side of front axle and lower machine onto jack stands.
3. If 4WD option is installed, jack up rear of machine so tires are off of ground. Place jack stands under left and right side of rear axle and lower machine onto jack stands.
4. Start engine. Unlock the park brake.
5. Watch tires for forward or rearward rotation.
6. Cycle forward and reverse hydrostatic pedals and allow to them to return to the centered, neutral position. Check again for tire rotation while in neutral, indicating a neutral adjustment is necessary.

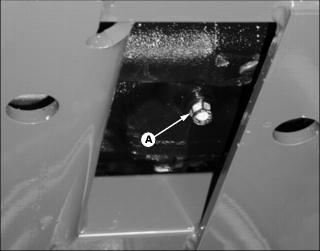
7. Open service hatch in operator's platform. Locate neutral adjuster screw (A) on top of transaxle.
9. Rotate screw until tires stop rotating.
10. Tighten lock nut. Cycle hydrostatic drive pedals and allow to return to neutral. Adjust screw again if necessary.
4WD Oil
· John Deere GL-5 Gear Lubricant is recommended.
· Other oils may be used provided they meet the following specifications:
Checking the 4WD Oil Level
1. Open the engine cover and locate the rear axle filler cap and dipstick (A) on the right rear side of the rear axle.
2. Unscrew filler cap and wipe dipstick clean.
3. Install filler cap back into axle housing but do not turn threads back in.
4. Remove dipstick and check oil level on it. Oil should be in XXX area on dipstick but not above top mark.
5. Add oil if needed. Do not overfill.
Changing the 4WD Oil
1. Park machine safely. (See Parking Safely in the Safety section.)
2. Raise rear of machine so tires are off of ground, and support rear axle with jack stands.
3. Remove rear wheels from axle.
4. Place drain pan under center of rear axle housing and remove center drain plug (A).
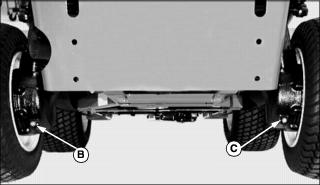
6. Remove left side final drive housing drain plug (B), and allow to drain.
8. Repeat steps six and seven for right side housing (C).
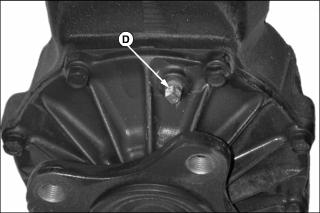
9. Remove air bleed screw (D) from top of left and right side final drive gear case.
10. Fill rear axle housing with recommended oil until oil begins to run out of air bleed screws. Install air bleed screws and continue filling rear axle until 2.1 L (2-1/4 qt) of oil has been put in. Do not overfill. Check oil level with dipstick. Run machine in 4WD, and check oil level.